Monday, October 22, 2012

The graphite project finished

This was a pretty good one.

This is an example of a daring student's work.

Add caption

Unfortunately some of the projects looked like this at the end.
So, I did the assignment, and it went fairly well. Here are a couple of things I learned.
1. cover the tables with butcher paper or something, the graphite makes a huge mess.
2. Cut the carpenter pencils in thirds. That gives enough to hold and for one or two mess-ups.

I only gave the class about 2 days for carving. There were some good carvings but when I instructed them to turn them in, I thought it was expedient to have them label what the sculpture was of.

Wednesday, August 15, 2012

Pencil Lead Carving

Graphite Carving by Dalton Ghetti

I am planning on doing pencil lead carving as my first assignment. I think might get them ready for wax carving. I have a box of straight pins and I bought 15 lbs of electrodes, and 50 carpenter pencils.

I plan on having the students flatten, grind, shape and sharpen the electrodes into tools. This will teach them how to make custom tools, and it is cheap. You can make them into great modeling tools. The 2D teacher sharpens them and uses them for carving Plexi-glass for print making, and for ceramic work.

I bought 50 of the large carpenter pencils for $0.28 each at Lowes. I probably could have gotten them for less, but I did not shop around, and I plan on cutting them into four pieces. Then the students will carve the leads.

I am hoping that this will help them develop a little finesse before they start carving their waxes, so they can do greater detail with fewer broken waxes. I also hope it helps them see that breaking their work is not the end.

Here is the link to the examples. Ghetti's work

Monday, May 7, 2012

vacuum casting pewter

Here is a video I made to show my students. I hope you can view it. It is about vacuum casting pewter.  I have tried all kinds of casting methods to get pewter to work for me but none of them worked that well. When I used centrifugal casting the pewter would run back out of the mold about half the time. Then I finally bought a new vacuum with a casting side, and I love it. The flasks are 100˚ Fahrenheit.
If you have any specific questions let me know.

Monday, April 16, 2012

This is an assignment that Kristine sent to me, I think there are some good ideas here.

I couldn't figure out how to attach it as documents, so I pasted it here.

 
Jewelry 1
Project 1: Research Project and Presentation

Guidelines for written report:
! Paper needs to be three (3) pages long, plus and title page and a bibliography page (total 5 pages)
$           If pictures or illustrations are included, they do not count as part of the three pages. It would be better to include them in the oral report visuals.
                       
! Paper must be typed in the following format: 
$           12 pt. font, Times New Roman
$           .75 margins
$           double-spaced
                       
! There must be a minimum of three (3) references, properly annotated on your bibliography page
$           One reference must be from an actual book
$           One reference may be from an online source, but not Wikipedia
$           The third reference may come from a book, a periodical, or an online reference other than Wiki.
                       
! Oral Report will be 2 minutes long.  Oral Report will be taken from the written report.  
                        Half (½) of the research grade will come from the oral presentation. 
! A power-point presentation or other visual aides should be used as part of the Oral Report.

! We will spend two days in the writing lab and library gathering information and working on the reports.  Any additional time needed to complete the assignment beyond that will be up to you.
           
Research Project Ideas: 


Turquoise, origins and mining
Diamond history
Diamond Cutting
Diamond mining
Amber
Rubies
Properties of gold
Gold mining
Fabrication of jewelry
Lost wax casting of jewelry
Lapidary work
Native American jewelry
            –Navajo
            –Zuni
Star Sapphires and rubies
Laboratory grown sapphires, rubies, and diamonds
Opals
History of Silversmithing
Silver mining in Utah
Crown jewels of ( a European country you choose)
Egyptian jewelry
Celtic jewelry
Sumerian jewelry
Hellenistic Jewelry
Etruscan jewelry
Cubic zirconia
Topaz
Garnet
Amethyst
Pearls
History of cultured pearls
Agate
Fresh water pearl farms
History of Birthstones
Chinese Jewelry
Jewelry of Central and South America
Mexican Silver
Victorian Jewelry
Art Deco Jewelry
Gemstone shapes and cutting
Cloisonne`
Moku Gane
Repousse`
Millefiori Beads
Lampwork beads
           
            Project Due: ______________________
 I thought I would talk a little about engraving. I have a fair selection of gravers, round, flat, knife, and they are some of the best wax carving tools I have for my classes. I went to the wood shop teacher and he had some of his students turn handles out of hard wood scraps for them, so they are pretty nice for about $6 each. But, they are really quite difficult to use on metal. I have a fair amount of students slip and stab themselves, so for most metal engraving I have found a better way.

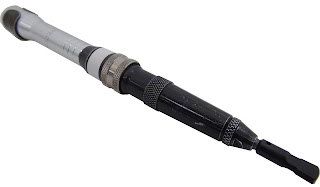
This is a Fordom hammer hand piece, and the tips are interchangable.
These some of the anvil tips that I have. From the left to right, they are as follows:
  1. round graver tip (I had to alter this one. I also made a finer tip graver, but it was on the tool when I took the picture of these heads. I used a sander to grind the tips)
  2. a great rounded bezel setting tip
  3. flat graver tip (also adapted) 
  4. a flat anvil head(I don't really use this that often, but it came in the kit. If anyone thinks of a use for it, let me know)
  5. a high speed carbide bur (it just happened to be in there when I took the picture)
  6.  a flat round anvil tip (very nice for setting smaller stones, in bead, box bezel, gypsy bezel, or prong sets. I also use it to mushroom rivet heads over in hard to get to places) 
  7. a domed and polished round anvil head (great for texturing) 
  8. a barrel anvil (I don't use this very often either)
I use these tips to engrave with. I also have a graver's vise which is really nice, but it was here when I got hired 12 years ago, I don't know if I would buy one now, because they are upwards of $450.
If your guys have input, ideas or questions I would love to here them.

Wednesday, April 4, 2012

Does anyone have a good way of polishing the edge of a piece of plate metal right up against another piece of plate when they are soldered together? I have a tumbler with stainless steel shot that burnishes pretty well, but it takes forever and I hate changing out the water every hour or so. I would appreciate any suggestions. 

Monday, April 2, 2012

How do you grade student work?

I have tried several ways. I have used rubrics, I have had them turn the jewelry into me, and I look at it and grade it, and I have had students bring their projects up to me and I discuss the grade I think they deserve, versus the grade they think they deserve. The problems I have had, is that rubrics take the creativity/effort out of the equation unless I get something so complex I hate to use it. I also have to give scripted assignments; the students can't do much in the way of personal creativity.

When it comes to having the students turn their stuff in, I have to grade it right away and give it back, or they have a conniption fit. But, there are always some who aren't there to get the projects back, so I end up having the things laying around, and it seems like I always lose something, generally to theft. It was annoying and to top it off, there was always someone who was not satisfied with their grade, but they couldn't produce the project, and I couldn't defend the ruling.

When I call the students up to grade with them it seems like at least a quarter of the class is not finished and so I waste a whole period then have to do it again, and again, and again, and again(get the picture).

Now I have a white box that I photograph their work in, then I grade it from the picture. I like this method pretty well, because I don't have to worry about losing their projects and I can do the actual grading when I feel like it. Another benefit is that I have the pictures to show students examples. I put them in slide shows as I introduce new projects, and we have the pictures for critiques. The down falls are that I have to crop and adjust every picture because I want them to look good and I don't have great lighting. Then the students take pictures of the good side of things so I don't always get an accurate view of things.

This ring shows a fairly accurate view for grading. It is soldered well, and the bezel is clean. It looks great, even if they could have filed the wire ends a little better.

This ring look pretty good from the picture, but I can't see what the band really looks like. Then I found out later that the bezel was not soldered on and the back of the band was broken.
So how do you grade?

Monday, March 12, 2012


Corian can be cut with any type of saw. I use a band saw for rough cuts and a scroll saw for more detailed cuts. A standard jewelry saw will work, but it takes a long time and then students usually hold the saw at an angle and really mess things up. Then you can use regular lathe tools and turn it on the lathe to shape the outside of the rings. I use spade bits to drill larger holes for fingers, then I use a drum sander on my flex shaft tool to to shape the finger hole to the exact size. I also use the lapidary grinders if there is any significant shaping that needs to be done. Then I also use high speed cutting burs to set stones, or carve details into it.

Wednesday, March 7, 2012

What my classroom looks like

This is my enameling station.

this is my wax station, where we sprue and fix broken rings, or add wax as necessary.

This is my back counter where I keep the roller mill and the anvils. The anvils are mostly old rail road track. I screwed them to the bench with a towel under each one to cut the vibration noise.

This is the back corner where I keep the drill press and disc sander.

This my drum sander. I have the sanders because I don't want the nonferrous metals to be used on the grinders. The ceramic pot has water in to cool the metals as you are sanding.

This is them miter saw I use cut wax tubes. It was $5 at a yard sale.

This is my table with ring lathes. I wired all the lathes to switches and then the switches to an extension cord so I can plug them all in at once.

This is on my back counter past the anvils, it is my bench vise where we use the draw plates and forming stakes. This is also where I have lathes and my scroll saw. The entire back counter is filled with drawers where I keep things like wax, nice hammers, lathe tools, extra wire and so on.

This is the end of my back counter where I have one more lathe, another belt/disc sander and under the counter I have the Pickle buckets.

This is my soldering station. There are 5 torches, patinas on the shelf, and nickle pickle plus regular pickle. I love the vent hood, I played the safety card to get it.

This is a station with a couple of flex shaft tools.

This is my stone setting, engraving, and wax carving station. There are 2 flex shafts and an apron to stop from dropping the stones.

This is my white box where I take photos of the students work.

This is the polishing station, I have a tripoli machine, Rouge machine, grinder, and lap felt buffer.

Right beside the buffers is the ultra-sonic cleaner, the sink and  the steam cleaner.

This is my lapidary station. There are three sets of grinding wheels and 2 stone saws.

This is the lampwork bead station. I have two torches. I just decided to charge the students $1 per hour, and then $.15 per gram for glass, I hope that will be enough to keep it up. If you have better pricing methods, would you let me know?


This is a large scotch bright buffer/grinder. Nest to it is a storage room.

This looking at my room from the door. I have 9 tables, 6 of which are set up for students to use.

This is a picture from the front of the room looking at the cabinets where I keep tools and student work.

These are my display cases.

This is how I organized my main tool cabinet.

This is the book case I made to hold the Text books(Complete Metal Smith by Tim McCreight)

This is inside my storage room that I keep locked up whenever I am not in it. I have my silver, nickle silver and solder on the wall. The plate metal is in the back corner. I have scrap metal in the drawers and chemicals in the cabinets.

This is the other side of the storage room where brass wire and nice tools are stored.

Again in the storage room, the Metal plating spot. I wish it were right by a sink, but I want it safe, so it is here instead.

The storage room, stones, drills, and so on.

My centrifuge casting station.

We invest in this spot, far from a sink to avoid having plumbing problems.

This is the vacuum casting spot, right across this room from the investment spot.

This is the burn out kiln.
I thought it might be nice to see how I set things up. I would like to see your shops if you could.

Monday, March 5, 2012

Welcome to the blog idea

Hi, this is the jewelry blog I said I would set up @ UAEA. I have never blogged before, so this might seem a little hokey at first but it should be good for improving all our programs. This is a ring that I put on here to see if I could.